His Mustache Smells Like Cabbage

Ambassador Bolton and his mustache

If anyone has a mustache that smells like cabbage, it is this guy-John R.Bolton.  On Fox News, he is known as Ambassador Bolton. Any time there is foreign policy discussion on Fox News, Fox trots out the Ambassador with the stinky cabbage mustache as the leading expert.

More recently, the Ambassador and his hairy appendage that adorns his pie hole is being considered to fill the position of Secretary Of State by the President Elect with the apricot hue.

What are Ambassador Bolton’s and his stinky mustache’s credentials you might ask?

Do you remember how President Obama was harpooned by Fox News for recess appointments (appointments made by the President when the Senate is in recess)?

It seems that the illustrious Ambassador was a Bush recess appointment to that One World Order Communist organization known as the United Nations. He served as UN Ambassador from June 2005 until August 2006 (a lofty foreign policy career of an entire 14 months) when he resigned to avoid the embarrassment of his recess appointment not being confirmed by the new session of the US Senate.

Prior to becoming an Ambassador, he avoided combat in Vietnam by joining the National Guard, and later writing, “I confess I had no desire to die in a Southeast Asian rice paddy.” Thank goodness he is still with us to deliver his neo-con dribble on world affairs on Fox News.

The Ambassador, whose hero was NC Senator Jessie Helms, also has a few other notable accomplishments. As a member of the Reagan Justice Department, he fought financial compensation to Japanese Americans held in internment camps, fought to preserve Reagan’s executive privilege, and was involved in Iran-Contra.

That is a lot of stinky cabbage in my book Mr. Ambassador.


Dill Pickles (the old fashioned way)

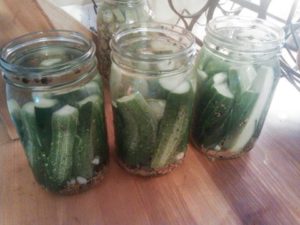
fermented dills quart jar


My cucumbers are thriving! Over the last two days I have cut enough cucumbers to make a batch of pickles.

I love to make dill pickles, but my recipe is a little different from some you may have seen before.

Most people have a favorite pickle recipe that uses vinegar.  I say anyone can buy a jug of vinegar and make pickles.

I love learning about the history of food, and making pickles by this method is one way our ancestors preserved their harvest before the modern era.

I recommend that you taste these every couple days.  I usually taste after 3 days, and find that 7 days is usually as long as I like to let them ferment.  Don’t freak out if you find mold growing on top of the brine.  That is normal.  If mold develops, just skim it off.  The most important thing to remember is to keep everything below the brine.  If the cucumbers float to the top and are exposed to air, they will rot.

Dill Pickles (lactose fermentation method)

Lactose fermentation is an ancient method of preserving food.  It is the same process used to make sauerkraut in many cultures.  Lactic acid produced from fermentation and salt prevent the growth of bad bacteria.  At the same time, it produces good bacteria that is very probiotic and is very good for digestion.  The recipe produces a half-sour dill pickle that is like a Claussen pickle found in the refrigerator section of the grocery, or like the traditional kosher dill in an authentic Jewish deli.

Fermented pickles can be made in any kind of food grade container.  A food grade 5 gallon bucket, crock, or a barrel can be used if you have enough cucumbers.  Also, the method can be applied to any kind of vegetable, not just cucumbers.  For my pickles, I use wide mouth glass quart canning jars

The basic recipe requires cucumbers, canning salt, distilled water, dill weed, and garlic cloves.  You can add other ingredients if you want.  DO NOT use chlorinated tap water or iodized salt as they inhibit fermentation and your pickles will rot.

Ingredients (per quart jar)

1 large pot for boiling water that a quart jar will fit into

1 wide mouth quart jar

1 half pint glass jelly jar

2 cups of distilled water

3 tablespoons of canning salt

1 teaspoon of mustard seed.

1 teaspoon of black pepper corns

1 teaspoon of pickling spice

3 cloves of garlic peeled

2 dried or fresh cayenne chilies

I head of dill weed

2 small bay leaves, one oak leaf or grape leaf (the tannins in the leaves ensures crispness)

6 or 7 pickling cucumbers 3 to 4 inches long


Directions

Wash and scrub the cucumber.  You can use tap water for this, but do not use soap.  Fill a large bowl with cool tap water and soak cucumbers overnight so that they are well hydrated.

Heat the distilled water slightly and dissolve 1 tablespoon of pickling salt into each cup of water.  The amount of water will vary depending on the volume of cucumbers in the jar.  I always make 2 cups of brine per quart of pickles (If using Kosher salt or Sea salt, add one tablespoon and 1 teaspoon per cups of water due to the size of the salt crystals).  Let the brine cool.

Boil water in a large pot and sterilize your quart canning jars and half pint jelly jars.  Remove from the water and let cool.

While jars and brine are cooling, cut the ends off of the cucumbers (the blossom ends of the cucumbers contain genetic material that tells the cucumber to rot).  This will help the pickles stay crisp.  Depending on size, half or quarter the cucumbers length wise.  You can make pickle chips, but it is imperative that the cucumber stay beneath the brine, and chips will easily float to the top of the jar.

Place all of the ingredients in the bottom of the jar, and then turn the jar slightly sideways and begin packing the cucumber spears or halves into the jar.  The idea is to pack them very tight so they do not float.

Once the jars are filled with all ingredients and cucumbers, pour the brine into the jar until it is one inch from the mouth.  Place the jelly jar on top of the cucumbers to act as a weight and to prevent floating cucumbers.  Some brine will spill over and that is okay.  Fill the jelly jar with brine to give it added weight.  Do not use tap water as it could spill into the brine.

Place a paper towel or cheese cloth over the top of the jars, and secure with a rubber band to keep out insects.

Place the jars in a cool place on the counter or in a cabinet.  Check the pickles daily.  If scum develops, remove the jelly jar and skim off and replace. On the second day the brine will begin to get cloudy.  That means that lactic acid is being produced and the pickling process is working.

The pickles will be ready to eat in about 3 days, but I recommend at least 7 days for half sour.  The rate of fermentation will vary with temperature.  The warmer it is, the quicker the fermentation process.  After 7 days, I put a top on the jar and put them in the refrigerator where they will keep for a few months.

Enjoy!


A Serial Killer: Tomato Blight

LateBlight12

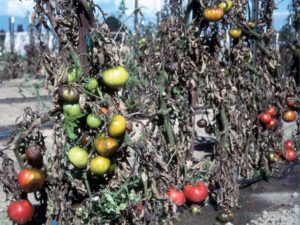
In 1845, potato farmers in Ireland began to notice spots on the leaves of their potatoes.  They could not have known that those little spots, with spores transferred on the wind, would kill more than a million people by causing potato crop failure and famine across Ireland.  The study of what caused the Irish potato famine and the mysterious leaf spot, was the beginning of the science of plant pathology.  Isolated and now identified by modern science as P.Infestans, the pathogen we know today as blight.


Blight afflicts potatoes, peppers, eggplant, as well as tomatoes.  To most experienced tomato growers, early and late blight seems an inevitable condition that comes around most every year.

LateBlight02

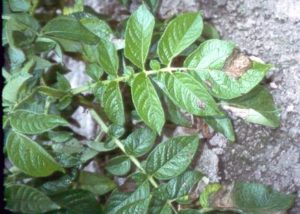
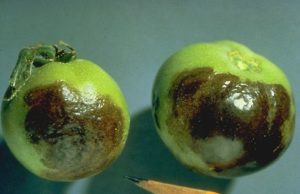
Blight can be recognized by large spots or legions often in the middle of the leaves.  The spots are often surrounded by a yellow border or light colored border.  Blight can cause the loss of leaves resulting in sun scald, or can grow directly on the fruit of the plant.

LateBlight14

Here is South Carolina, Clemson University has already reported a case of blight in April 2016 found in a home garden in Beaufort, SC.  Blight, carried on the wind, is thought to have blown in from Florida.

Because blight can spread so easily on a breeze, it makes other plants nearby susceptible.  Blight can easily be spread to your neighbor’s garden, or to a nearby commercial grower.

Prevent the spread of blight by taking the following precautions:

  • leaves on groundPrune the bottom of the plant to promote air circulation and to keep the plant from touching the ground.
  • Steak tomatoes so that they stand up-right and have good air circulation.
  • Warm moist conditions are perfect to promote the growth of blight. Never water at night.  Water during morning hours so the plant can dry quickly.
  • Learn to recognize blight on your plants and take measures to stop the spread. This can include spraying the plants, or in the worst case-destroying the plants.  Infected plants should never be composted.  They should be bagged and thrown in the trash or burned!

 What do you do if you get blight?

  •  Prune infected leaves or branches and destroy. Do not leave trimmings in the garden or put into compost.
  • Commercial growers have access to chemicals that will kill blight. Most home gardeners only have access to preventative measures.  Copper sprays work well and some are approved for organic use.
  • A baking soda solution of 1 tablespoon per gallon mixed with water and sprayed on the plant until dripping will change the PH of the plant’s surface to prevent the growth of blight.

 Sources: (http://www.apsnet.org/edcenter/intropp/lessons/fungi/oomycetes/Pages/LateBlight.aspx),

(http://www.smithsonianmag.com/science-nature/scientists-finally-pinpoint-the-pathogen-that-caused-the-irish-potato-famine-71084770/?no-ist)

(http://newsstand.clemson.edu/mediarelations/highly-infectious-late-blight-disease-found-on-tomatoes-in-south-carolina/)